On the website
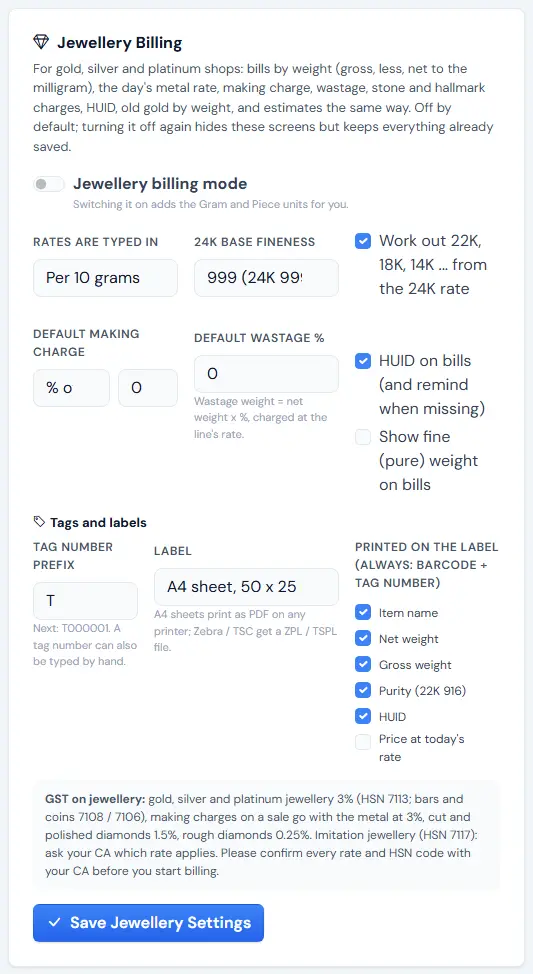
- Sidebar SYSTEM → "Settings", find the "Jewellery Billing" card.
- Switch on "Jewellery billing mode" (it adds the Gram and Piece units for you).
- Choose "Rates are typed in": "Per 10 grams" or "Per gram", and the "24K base fineness" (999 or 995).
- Tick "Work out 22K, 18K, 14K ... from the 24K rate" if you type only the 24K rate.
- Set the "Default making charge" (% of metal value / per gram / flat per piece) and "Default wastage %".
- Tick "HUID on bills (and remind when missing)" and "Show fine (pure) weight on bills" if you want them.
- Under "Tags and labels" set the "Tag number prefix" and your label size.
- Click "Save Jewellery Settings".
In the app
☰ Menu → Settings → "System" tab → "Jewellery Billing" card → "Jewellery Settings". The same options; tap "Save Jewellery Settings".
What changes
- New menu items: "Today's Rates", "Tags", "Job Cards" (app: "Job cards"), "Orders" and "Jewellery Reports". In the app, Quick Bill also gets a "Job work (repair) bill" link.
- Bills become "Items (by weight)" with gross / less / net weight, making, wastage, stone and HUID.
- The exchange card becomes "Old Gold Taken In".
- Item and party forms get jewellery and KYC fields; quotations become weight-based estimates.
Tip: Switching it off later hides the jewellery screens but keeps all saved data.
